
Heading to your first radiology scan? Here’s what you need to know to feel prepared and confident. Radiology scans like X-rays, CTs, MRIs, and ultrasounds help doctors diagnose and manage health conditions. But before your appointment, it’s important to ask the right questions to ensure you’re ready, safe, and informed. Key things to check include:
- Type of scan: Understand the purpose and technology behind it.
- Preparation: Do you need to fast, have a full bladder, or avoid certain items?
- Risks: Ask about radiation, contrast dye, and safety during pregnancy or breastfeeding.
- Costs: Public scans are often free, but private ones can range from NZ$75 for X-rays to over NZ$2,500 for MRIs.
- What to bring: Referrals, health insurance details, and any relevant medical information.
Preparation is key – know what to expect during and after your scan, including how long it will take, what happens during the procedure, and when you’ll get your results. Keep reading for a detailed guide to help you navigate your first radiology scan with ease.
Understanding Your Scan and Why You Need It
What type of scan am I having?
Your appointment letter should outline the type of scan you’re scheduled for, but it’s always helpful to double-check with your healthcare provider. Different scans use specific technologies tailored to various diagnostic needs:
- X-rays rely on radiation to create images, making them great for examining bones or spotting changes in the lungs.
- CT (Computed Tomography) scans also use X-rays but provide highly detailed "slice-by-slice" images of soft tissues, organs, and bones.
- MRI (Magnetic Resonance Imaging) employs magnets and radio waves to generate detailed 3D images, often used for conditions involving the brain, spinal cord, or joint injuries.
- Ultrasounds use high-frequency sound waves to produce images and are radiation-free.
The time required for your scan, including preparation, depends on the type and area being examined. If you’re scheduled for an MRI, let the staff know about any metal fragments or implanted devices (like pacemakers or cochlear implants), as the magnets could pose risks. For CT or X-ray scans, it’s crucial to inform your provider if you’re pregnant, as radiation could affect the baby.
Understanding the type of scan helps clarify why it’s been chosen and what to expect during the process.
Why is this scan necessary?
Knowing the type of scan also explains its role in diagnosing or managing your condition. Radiology scans provide a non-invasive way for doctors to examine internal structures like organs, bones, and tissues.
"The images help with the diagnosis of damage or disease and help guide treatment." – Health New Zealand
Scans might be used to determine the extent of an injury, diagnose conditions such as cancer, monitor the success of treatments, or assist with certain procedures. During your follow-up appointment, your doctor will go over the radiologist’s report with you and discuss how the results could influence your treatment plan. This is also a good time to ask about any preparation steps, safety measures, or details about the procedure itself.
sbb-itb-16a0ccc
How to Prepare for Your Scan
Do I need to follow any preparation steps?
The preparation you’ll need depends on the type of scan and the area being examined. Your appointment letter should outline the specific steps, but if anything seems unclear, it’s worth checking with your healthcare provider. Proper preparation ensures accurate imaging and keeps you safe.
For CT scans that use contrast dye, you’ll likely need to fast for 2–4 hours to reduce the chances of nausea. You can still take your usual medications with water. If you’re managing diabetes and need to fast, consult your doctor for advice on adjusting your insulin or medication during this time.
Abdominal ultrasounds, such as those for the liver, gallbladder, or pancreas, typically require fasting for 4–6 hours. This helps avoid interference from food or gas. Drinking water is fine during the fasting period. On the other hand, pelvic or renal scans require a full bladder for clear imaging. To prepare, drink about 750–900 ml (3–4 glasses) of water one hour before your appointment and avoid using the bathroom. If your bladder isn’t full 10 minutes before the scan, drink a bit more water.
If your scan involves contrast dye, staying hydrated afterwards is crucial. Drinking extra water helps your body flush out the iodine. In some cases, your doctor may also require a blood test beforehand to check your kidney function.
Finally, don’t forget to think about what to wear and what to bring for a smooth appointment experience.
What should I wear or bring to the appointment?
Choose comfortable, loose-fitting clothing without any metal fastenings like zips, buttons, or underwire bras. You might need to change into a gown, so it’s best to leave jewellery and metal accessories at home.
In New Zealand, you’ll need a referral for your scan, as self-referrals aren’t an option. Bring a copy of your referral along with any relevant health insurance details and previous imaging reports for comparison. If you have private health insurance, such as with Southern Cross or NIB, make sure to bring your membership number for prior approval or billing purposes.
When you arrive, you may be asked to fill out health questionnaires about allergies, medical conditions, or implants. If you have internal metal devices like pacemakers, cochlear implants, or surgical clips, let the staff know in advance – this is especially important for MRI scans, as the magnetic field could pose risks.
Safety and Risks of Radiology Scans
Are there any risks involved?
The level of risk associated with radiology scans depends on the type of scan. For instance, X‑rays, CT scans, and mammograms use ionising radiation. While CT scans provide highly detailed images, they also involve a higher radiation dose compared to standard X‑rays. However, diagnostic imaging generally uses very low doses of radiation, as noted by Bay Radiology.
For those concerned about radiation, ultrasound and MRI scans are excellent alternatives. Ultrasound relies on sound waves, and MRI uses magnetic fields – neither involves radiation, and no harmful side effects from exposure have been reported. That said, MRI scans do require special precautions if you have implants or metal fragments in your body.
Some scans, such as CT scans, may involve the use of contrast dye. This can cause temporary sensations like a warm flush, a metallic taste, or the urge to urinate. While most people tolerate contrast dye well, mild reactions such as itching or a rash can occur. Serious allergic reactions are rare, but radiology teams are fully trained to handle them. Since contrast dye is processed by your kidneys, you might need a blood test beforehand. Drinking extra water after the scan can also help your body flush out the dye.
Understanding these risks empowers you to ask informed questions and make thoughtful decisions about your care. Special circumstances, such as pregnancy or breastfeeding, require additional consideration – more on that below.
Is this scan safe during pregnancy or breastfeeding?
If you’re pregnant, think you might be, or are breastfeeding, it’s essential to inform the radiology team before your scan. Some imaging methods can pose risks to a developing baby. For example, X‑rays and CT scans use ionising radiation, which has the potential to damage cells and genes. Health New Zealand advises:
"You will not be able to have a CT scan if you are pregnant – the radiation could harm your pēpi (baby)".
Ultrasound and MRI scans are generally the preferred options during pregnancy because they don’t use ionising radiation and are considered safe. In cases where a radiation-based scan is absolutely necessary, it will only be performed if the medical benefits outweigh the risks. To give some perspective, the natural baseline risk of childhood cancer for any unborn child is around 1 in 500 (0.2%). A CT scan of the pelvis might slightly increase this risk, but the overall risk remains very small. On the other hand, ultrasound and MRI pose no additional risk.
For breastfeeding mothers, it’s also important to notify the staff, particularly if contrast dye is part of the procedure. You may be advised to drink extra water afterward to help clear the dye from your system. If you later discover that you were pregnant during a scan, consult your doctor. Experts can calculate the specific risk, which is usually very low for a single exposure.
What Happens During and After Your Scan
How long will the scan take?
The time needed for a scan depends on the type of imaging being done. X-rays are the quickest, usually wrapped up in about 5 to 10 minutes. CT scans are also pretty fast – the scanning itself takes just seconds to a few minutes. However, if a contrast dye is involved, the entire appointment might stretch to about 30 minutes. On the other hand, MRI scans take much longer, ranging from 30 to 90 minutes depending on the area being examined.
If sedation is part of the process, you’ll need to arrange for someone to help with transport afterward. That said, most scans don’t require any observation after they’re done, so you can leave as soon as your procedure is complete.
What happens during the procedure?
A radiographer will assist you in getting into the correct position for the scan. You’ll lie on a table that either moves through a ring-shaped scanner (for CT scans) or slides into a tunnel-like machine (for MRIs). It’s crucial to stay still and, for certain scans like chest or abdominal imaging, follow breath-holding instructions to ensure the images are clear. Throughout the procedure, technicians will monitor you via an intercom system. For MRIs, you’ll receive earplugs or headphones to protect your hearing, as well as a call bell to signal the technologist if needed.
If contrast dye is part of the process, you might briefly feel warm, notice a metallic taste, or experience a fleeting urge to urinate. These sensations are entirely normal and pass quickly.
When will I receive the results?
Once your scan is complete, the next step is waiting for the results. These aren’t available on the spot because a radiologist first needs to review and interpret the images to create a detailed report. According to Dr. David Hough:
"the report is usually available to the referring doctor within 24 hours, or immediately in urgent cases".
Your GP or specialist will go over the findings with you during a follow-up appointment or may contact you via phone, email, or text message. If you don’t hear back within the expected timeframe, it’s worth reaching out to your doctor’s office to confirm they’ve received the report.
What to expect and how to prepare for a medical imaging exam
Costs and Funding in New Zealand
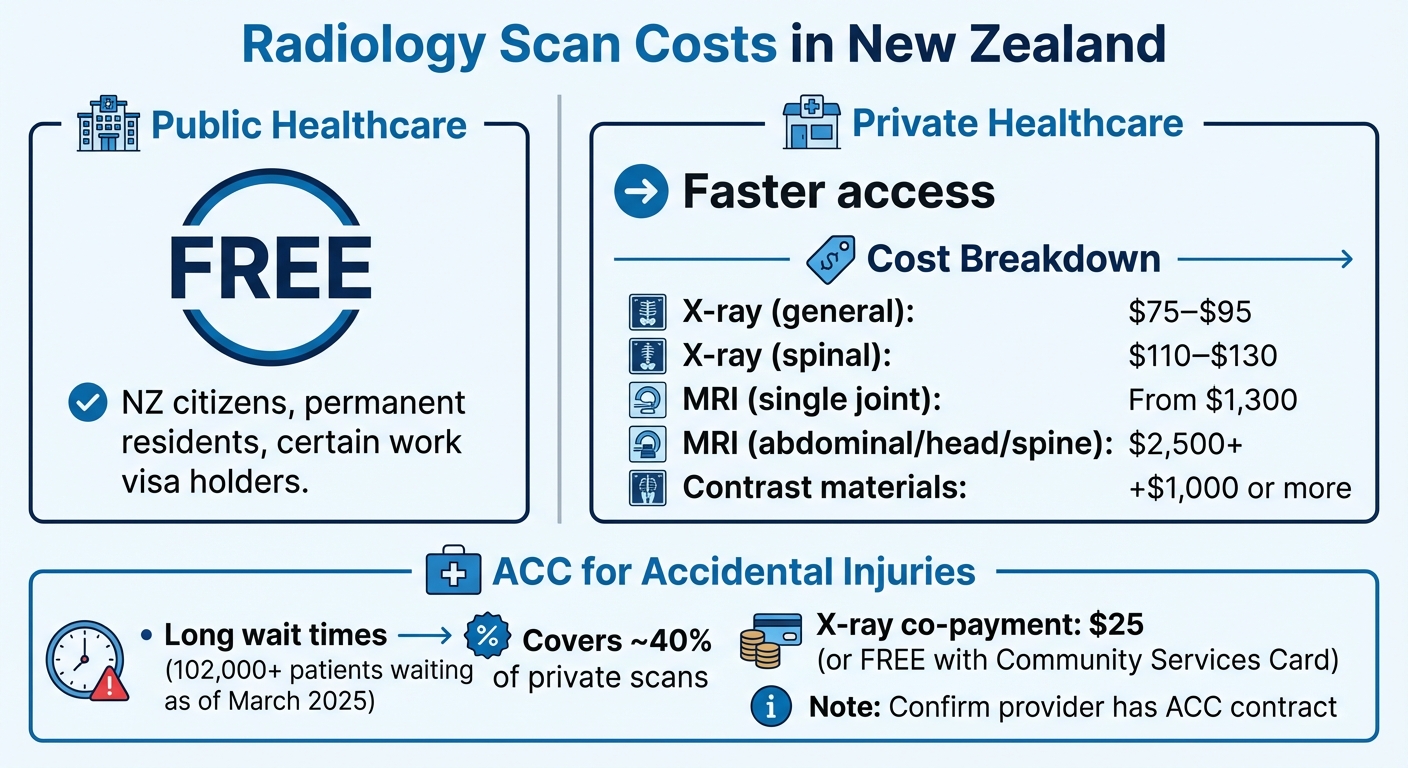
Cost Comparison of Radiology Scans in New Zealand: Public vs Private Healthcare
When planning for a scan in New Zealand, it’s important to understand both the costs involved and the funding options available.
What are the costs for the scan?
The cost of a scan varies depending on whether you go through the public or private healthcare system. If you qualify for public healthcare, scans at public hospitals are generally free. However, the downside is the long wait times – as of March 2025, over 102,000 patients were waiting for radiology scans across the country.
Private clinics, while offering quicker access, charge fees that depend on the type of scan. For example:
- A basic X-ray typically costs between NZ$75–NZ$95 for general areas or NZ$110–NZ$130 for spinal imaging.
- An MRI for a single joint starts around NZ$1,300, while abdominal, head, or spine scans can exceed NZ$2,500.
- Adding contrast materials to the scan can increase costs by an additional NZ$1,000 or more.
If the scan is related to an accidental injury covered by ACC, the costs can be much lower. For instance, an ACC patient might pay as little as NZ$25 for an X-ray co-payment, or nothing at all if they hold a Community Services Card. For private scans requiring insurer approval, it’s a good idea to request a written quote beforehand. Understanding these costs helps you plan and explore funding options.
Are there public funding or ACC options available?
Funding support is available through public healthcare and the ACC scheme, depending on your situation. ACC covers scans required due to accidental injuries, accounting for about 40% of private scans in New Zealand. If your scan falls under ACC, confirm that your provider has an ACC contract and ask about any surcharges or co-payments that may apply. Be aware that even with ACC coverage, some procedures, such as ultrasounds, might still require an upfront surcharge.
For public funding, eligibility is tied to your residency status and referral pathway. New Zealand citizens, permanent residents, and certain work visa holders are entitled to free scans at public hospitals. In some areas, private clinics perform publicly funded scans under contract with Health New Zealand. If you’re referred through this pathway, there’s no charge.
To ensure you’re fully informed, discuss your funding options and eligibility with your GP or specialist during the referral process. For injury-related queries under ACC, you can also contact them directly at 0800 101 996. Being proactive about these details can save you time and unexpected costs.
Medical Conditions, Implants, and Medications
When preparing for a radiology procedure, sharing your medical history is a key step. Providing this information helps ensure the scan is both safe and effective.
Do I need to disclose any medical conditions or implants?
Yes, it’s essential to inform the radiology team about any metal or electronic devices in your body, especially before undergoing an MRI. The powerful magnetic field during an MRI can cause implants to shift, heat up, or malfunction.
"Objects that have been implanted in your body need to be discussed ahead of the MRI scan – they may cause harm or be damaged." – Health New Zealand
This also includes non-medical metal objects, like shrapnel or metal fragments – these should be reported immediately. If you’ve had a tattoo done recently (within the last six weeks), let the clinic know, as fresh tattoos can interfere with imaging. In cases where an implant makes an MRI unsafe, your healthcare provider might recommend a CT scan instead. Be sure to mention these details when scheduling your appointment and again when you arrive to avoid any issues.
What if I have allergies or take medications?
Just like with implants, sharing information about allergies and medications is equally important. For example, if you’re using a transdermal medicine patch, check with your doctor or pharmacist before an MRI – some patches contain metal, which could lead to skin burns during the scan.
If you have allergies to contrast dye, kidney issues, or diabetes, notify the radiology team right away. These factors might require adjustments to the procedure, especially if contrast material is involved. On the day of your MRI, avoid wearing makeup or hairspray, as these products may contain tiny metal particles that could interfere with the imaging process. Your sonographer will discuss your health history to customise your care, so being transparent and thorough ensures a smoother and safer experience.
Preparing for a Smooth Scan Experience
Walking into your first radiology scan can feel a bit daunting, but being well-prepared can make the process far easier. Take a moment to review any specific instructions you’ve been given – this small step can make a big difference.
"It’s important to read through the procedure information, prepare appropriately before your appointment, and arrive for your appointment in plenty of time." – I-MED Radiology NZ
If your scan requires fasting or a full bladder, double-check these details with your clinic beforehand. Following these guidelines ensures the scan goes smoothly and avoids unnecessary delays.
Once you’re clear on the preparation steps, plan your journey so you can arrive early. Having extra time allows for check-in, completing any paperwork, and calming any pre-scan jitters. Wear loose, comfortable clothing without metal, as you might need to change into a gown. If you’re uneasy about enclosed MRI spaces, let the clinic know when booking – they can provide relaxation techniques or prescribe a mild sedative if necessary. Keep in mind, if sedation is used, you’ll need someone to drive you home or accompany you in a taxi or Uber.
If you have any lingering questions, use the contact details provided in your appointment letter. For general information or to find a radiology provider near you, you can visit Radiology Clinics NZ to explore available services and locations. Taking these steps not only helps you feel more at ease but also ensures your scan experience is as smooth as possible.
FAQs
Can I drive home after my scan?
Most patients are fine to drive themselves home after a radiology scan, like an MRI or CT, provided no sedation or contrast agents that might cause drowsiness or dizziness were used. However, if these substances were administered, it’s best to wait until their effects have completely worn off and to follow the advice given by the clinic staff. If you’re feeling unsteady or unsure, it’s a good idea to organise a ride home with someone else.
What if I’m claustrophobic in an MRI?
If you struggle with claustrophobia, there are steps you can take to make an MRI experience more manageable. Many modern MRI machines now feature wider openings, improved lighting, and better airflow, which can help reduce discomfort. Some scans are quicker or might not even require your head to be inside the machine. If you’re feeling anxious, talk to your healthcare provider – they may recommend a mild sedative to help you relax during the procedure.
Can I eat and take my usual meds beforehand?
You can generally eat and continue taking your usual medications before a radiology scan unless told otherwise. For most MRI scans, there are no dietary restrictions. However, preparation for CT scans can differ – sometimes you may need to fast or drink a special liquid if contrast dye is involved. Be sure to follow the specific instructions given by your healthcare provider or imaging centre for your procedure.

Author: Mark
I'm a radiologist passionate about technology to improve healthcare, and manage a variety of apps to help support radiologists and the community.
Leave a Reply