
Preparing for an ultrasound? Here’s what you need to know:
- Follow prep instructions: Some scans require fasting (e.g., abdominal scans need 4–6 hours of fasting). Others, like pelvic or early pregnancy scans, need a full bladder (drink 750 ml–1 litre of water an hour before). Check with your clinic for specific requirements.
- Bring essentials: Don’t forget your referral form, previous imaging records, photo ID, and payment or insurance details.
- Dress comfortably: Wear loose clothing for easy access to the scan area. You may need to change into a clinic-provided gown.
- Know what to expect: The scan is painless, involves applying gel to your skin, and typically takes 30–45 minutes. For internal scans, you can request a female sonographer if preferred.
Ultrasounds are safe, radiation-free, and widely used for medical imaging. After the scan, results are reviewed by a radiologist and sent to your doctor, usually within a week. Always confirm specific instructions with your clinic before your appointment.
How can I prepare for my Abdominal or Pelvic Ultrasound?
sbb-itb-16a0ccc
Preparation Steps for Different Ultrasound Types
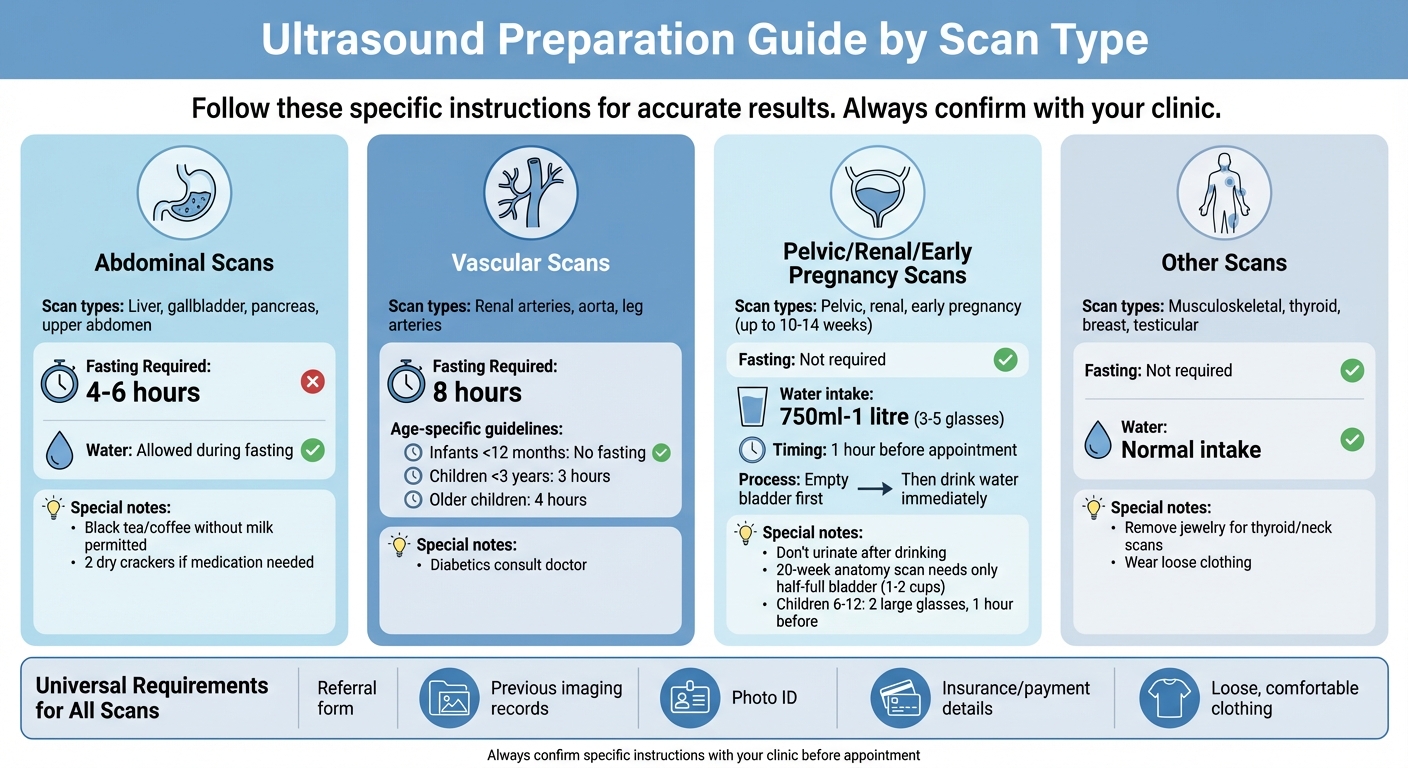
Ultrasound Preparation Guide by Scan Type
Fasting and Food Restrictions
Certain ultrasound scans require fasting to ensure the clearest possible images.
For abdominal scans – such as those focusing on the liver, gallbladder, pancreas, or upper abdomen – you’ll need to fast for 4–6 hours beforehand. This helps keep your gallbladder full and reduces interference from food or gas. Water is allowed during this time, and some clinics may permit black tea or coffee without milk. If you need to take medication with food, two dry crackers are usually acceptable.
For vascular ultrasounds – like those examining the renal arteries, aorta, or leg arteries – a longer fasting period of 8 hours is typically required. Infants under 12 months do not need to fast, while children under 3 fast for about 3 hours, and older children for around 4 hours. If you have diabetes, it’s important to consult your doctor to safely manage your blood sugar levels during fasting.
Water Intake and Full Bladder Requirements
For pelvic, renal, and early pregnancy scans (up to about 10–14 weeks), you’ll need to drink between 750 ml and 1 litre of water – roughly 3–5 glasses – starting about an hour before your appointment. The process usually involves emptying your bladder first, then drinking the required amount of water immediately after. A full bladder helps by pushing the bowel aside, making it easier for the sonographer to capture clear images of the uterus, ovaries, or prostate. Avoid urinating once you’ve finished drinking; if you feel discomfort, you can release a small amount without completely emptying your bladder. For a 20-week anatomy scan, a half-full bladder is sufficient, which can usually be achieved by drinking 1–2 cups of water.
For children aged 6–12 undergoing renal or pelvic scans, drinking around 2 large glasses of water one hour before the appointment is recommended.
Preparation for Other Scan Types
Some scans don’t require fasting or specific hydration. For musculoskeletal, thyroid, breast, and testicular scans, preparation is straightforward. For thyroid and neck scans, remove any jewellery and wear loose clothing to allow free movement of your neck. Musculoskeletal scans may involve moving your arms or legs during the procedure to help identify the source of discomfort. For testicular scans, wearing loose-fitting clothing is advised, as you may need to change into a medical gown.
Lastly, always bring your referral form and any past imaging results to help with comparisons during the scan.
What to Wear and Bring
Clothing Guidelines
Choose loose, comfortable clothing that you can easily remove or adjust to allow access to the area being scanned. In some cases, you might need to change into a gown provided by the clinic. For shoulder scans, women are advised to wear a singlet with thin shoulder straps for convenience.
Items to Bring to Your Appointment
To ensure your appointment goes smoothly, make sure you bring the following essentials:
- Referral form: Clinics accept referral forms from any provider, even if they were issued for a different facility.
- Previous imaging records: If you’ve had scans of the same area before, bring those records. They help the radiologist compare results and monitor any changes. For pregnancy scans, don’t forget your growth chart if you have one.
- Photo ID and payment or insurance details: Some clinics may charge a $10 fee for providing digital access to your scan images through a secure portal or app.
Most clinics allow one adult support person to join you during the appointment. However, if you’re bringing children, check the clinic’s policy in advance, as many require another adult to supervise them.
What Happens During Your Ultrasound
The Ultrasound Process
When you arrive for your ultrasound, you’ll check in and may be asked to change into a gown, depending on the type of scan. The sonographer will go over the procedure with you and ask questions about your medical history or the reason for your scan.
You’ll then lie down on the examination table, where the sonographer will apply a conductive gel to your skin. This gel helps the transducer – a handheld device used for scanning – move smoothly across your skin and transmit high-frequency sound waves to create detailed, real-time images. The gel might feel a bit cool, but the procedure itself is completely painless.
"Your scan is performed with particular emphasis on answering the question asked by your referrer, as well as looking for any other findings." – Advance Ultrasound
For internal pelvic scans, a small probe is gently inserted into the body. If this is part of your procedure, you can assist with positioning the transducer and may request a female sonographer if you prefer. In some cases, additional procedures, like a biopsy, might be done during your scan. For these, a radiologist uses ultrasound to guide a needle to the precise location, and a local anaesthetic is applied to minimise any discomfort.
During the scan, the sonographer may stay quiet to focus on capturing accurate measurements and images. Feel free to ask questions during natural pauses, but keep in mind that most clinics do not allow video recording or photography during the procedure.
The entire process is designed to ensure the images are clear and the results are as accurate as possible.
Appointment Length and Communication
Most diagnostic ultrasounds take between 30 and 45 minutes to complete, though some specialised scans might extend to an hour. The sonographer will guide you throughout, asking you to hold your breath, stay still, or adjust your position to ensure the best possible image quality.
After Your Ultrasound
Getting Your Results
Once your ultrasound is complete, the process of reviewing and sharing your results is straightforward. The images from your scan are stored digitally and carefully reviewed by a radiologist, who then prepares a detailed report. This report is sent directly to your referring doctor, typically within about a week, according to Dr Omid Ahmadi.
Many clinics now offer digital access to your images and reports through secure patient portals like MyImaging or via email links. If you’re interested, ask the reception team on the day of your appointment about accessing these digital copies. Keep in mind, some providers may charge a fee of around NZ$10 for providing a digital link to your images. For scans involving a needle biopsy, the results may take longer due to additional processing time.
It’s a good idea to book a follow-up appointment with your referring doctor approximately a week after your scan. This allows you to go over the results together and discuss any next steps.
Understanding your results is key, and it’s just as important to be informed about the safety of the procedure.
Safety Information
Ultrasound is not only effective but also highly regarded for its safety. Using low-power, high-frequency sound waves to produce images, it does not rely on radiation and has no known risks. As Auckland Radiology explains, "Ultrasound is a safe procedure that uses low-power high-frequency sound waves to create images of the body. As ultrasound does not require radiation and there are no known risks". Diagnostic ultrasound has been in use since the 1950s, with no evidence linking it to adverse health effects.
For most scans, you can return to your usual activities right away. However, if sedation was part of the procedure, make sure you have someone to drive you home and stay with you for the next 24 hours. During this time, avoid alcohol and refrain from operating heavy machinery. If you had a biopsy as part of your scan, you might experience mild tightness or swelling at the site for a day or two, which is entirely normal.
Conclusion
Preparing for an ultrasound appointment doesn’t have to be complicated. The most important steps include following any fasting, hydration, or clothing instructions specific to your scan, bringing along your referral form and past imaging records, and confirming your appointment at least 4 hours ahead if required by your clinic to avoid any issues. Unless advised otherwise by your doctor, continue taking your regular medications. If you have diabetes or concerns about fasting, it’s best to consult your doctor beforehand.
FAQs
What if I accidentally eat or drink before a fasting ultrasound?
If you eat or drink before a fasting ultrasound, it could interfere with the accuracy of your results – especially for abdominal scans, which often require an empty stomach. If this happens, let the radiology team know right away. They might suggest rescheduling or give you additional instructions. Always stick to the preparation guidelines provided for your specific ultrasound, and don’t hesitate to reach out to the clinic if you have any questions or concerns.
Can I still take my regular medicines before the scan?
You can usually keep taking your regular medications before an ultrasound unless your healthcare provider tells you otherwise. Some types of scans might require specific preparation, like fasting or having a full bladder, but these instructions generally don’t include stopping your medications. If you’re uncertain – particularly about medications for conditions like diabetes or high blood pressure – check with your doctor or the radiology centre for advice.
Will my results be explained to me on the day?
Yes, the sonographer will go over your results with you during the appointment and address any questions you might have. Don’t hesitate to ask if you need anything clarified or want more details.
Related Blog Posts

Author: Mark
I'm a radiologist passionate about technology to improve healthcare, and manage a variety of apps to help support radiologists and the community.
Leave a Reply