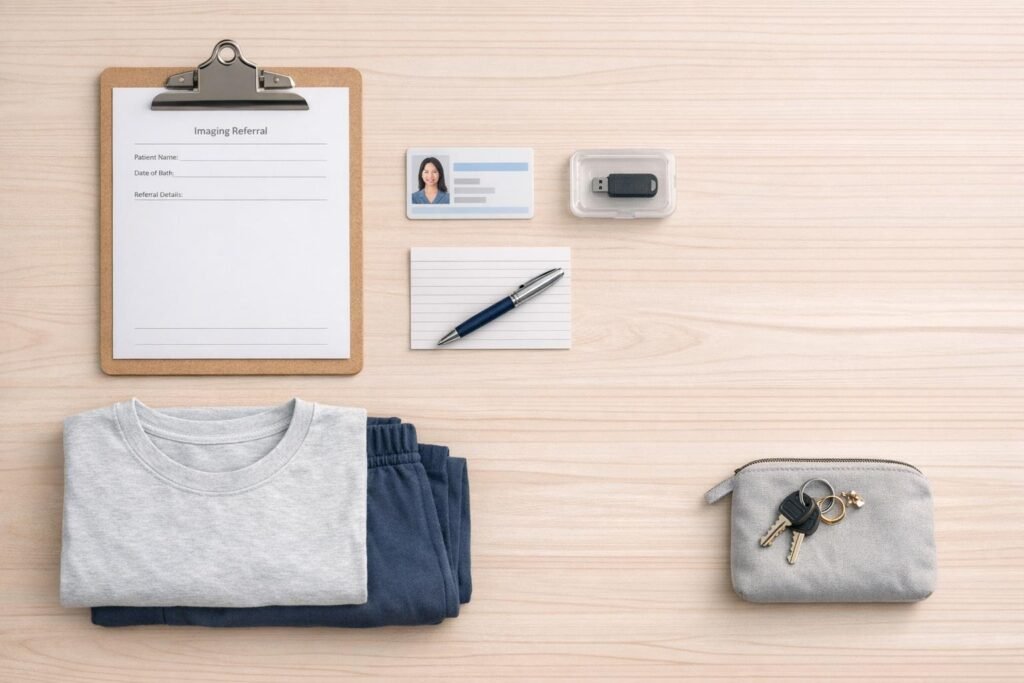
Being prepared for your imaging appointment can save time and prevent delays. Here’s a quick summary of what you need to bring and do:
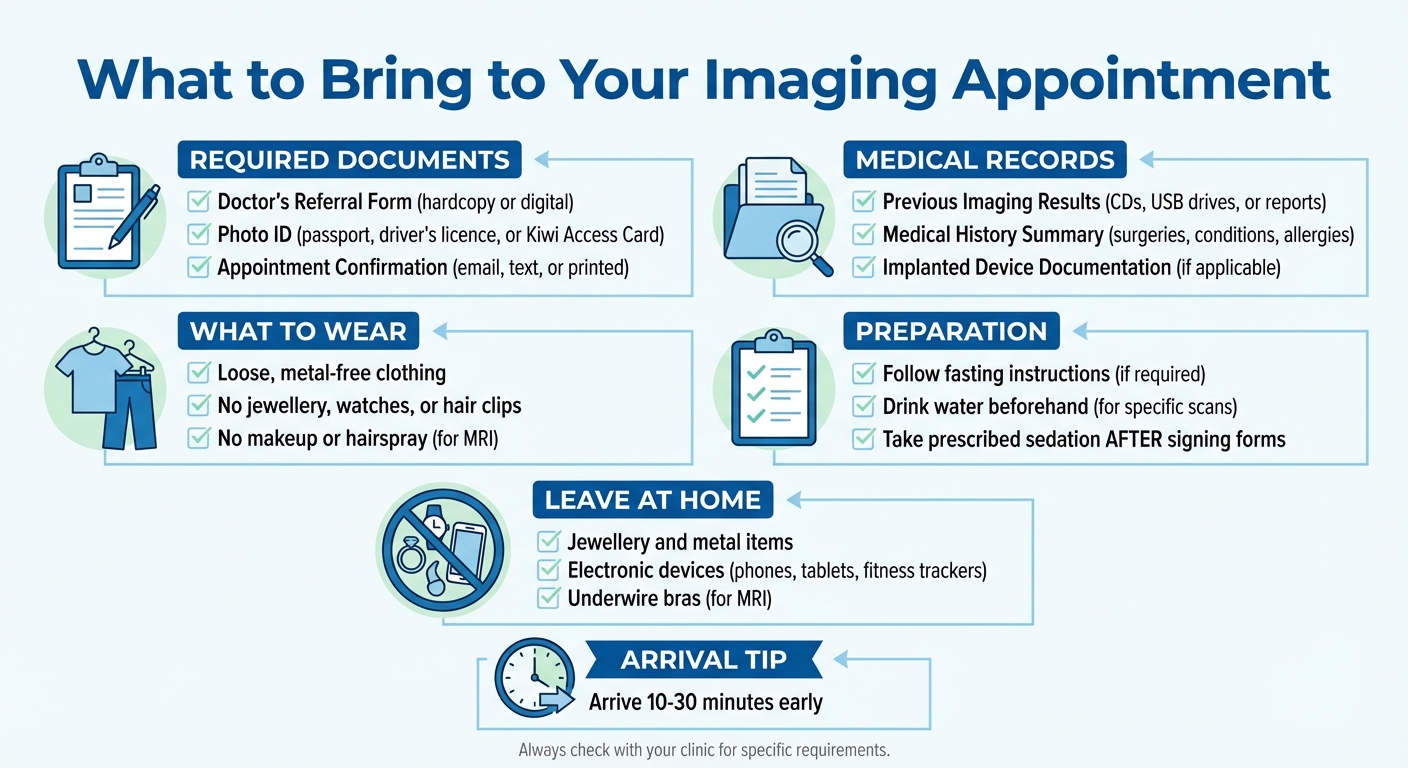
- Referral Form: A doctor’s referral is mandatory for most scans. Ensure the clinic has a copy (hardcopy or digital) before your appointment.
- Photo ID: Bring valid photo identification, such as a New Zealand passport, driver’s licence, or Kiwi Access Card.
- Appointment Confirmation: Have your email, text, or printed confirmation handy.
- Medical History and Past Imaging: Include details of previous surgeries, conditions, allergies, and any prior imaging results (CDs, reports, or digital files).
- Clothing: Wear loose, metal-free clothing. Avoid jewellery, makeup, and hairspray.
- Preparation Instructions: Follow specific requirements for your scan, such as fasting or drinking water beforehand.
Arrive 10–30 minutes early to complete paperwork and ensure a smooth process. If sedation is involved, arrange transport and take the rest of the day off. Always check with your clinic if you’re unsure about anything.
Essential Items Checklist for Medical Imaging Appointments
Preparing for Your MRI: What to Expect and How to Get Ready
Required Documents
Make sure you bring all the necessary paperwork to avoid delays or the need to reschedule.
Doctor’s Referral Form
A referral from a registered medical professional is required for most imaging procedures in New Zealand, such as X-rays, CT scans, and MRIs. This can be provided by a doctor, specialist, nurse, physiotherapist, osteopath, or chiropractor. For advanced imaging like MRIs, some clinics might insist on a referral from a Medical Specialist rather than a GP.
If you have a hardcopy referral, bring it along. Many clinics also accept digital copies. You can take a clear photo of the referral and upload it to the clinic’s website before your visit. To avoid any issues, call the clinic the day before to confirm they’ve received your electronic referral.
Appointment Confirmation
Your appointment confirmation – whether it’s an email, text, or printed letter – is important. It often includes preparation instructions and helps the reception team verify your booking. Having this ready ensures everything is in order before your arrival.
Additionally, you’ll need a valid photo ID to complete the check-in process.
Photo Identification
Photo ID is essential to confirm your identity and link your results to your medical records. Acceptable forms of ID include:
- New Zealand passport
- New Zealand driver’s licence (must be a current photo licence, not a temporary paper version)
- Kiwi Access Card (previously the 18+ card)
- Firearms licence
If you’re visiting from overseas, bring your valid passport. For Australian visitors, note that an Australian driver’s licence is often not accepted as valid ID for regulated activities in New Zealand. A passport is the safest option in such cases.
Medical History and Past Imaging
To make your imaging appointment smoother and more effective, bring along all relevant medical history documents and past imaging results. These help radiologists compare your current scans with older ones, which is essential for spotting changes or assessing if a condition has improved or worsened.
Previous Imaging Results
If you’ve had imaging done before – whether at the same clinic or somewhere else – it’s essential to bring those results. This could include CDs, USB drives, printed reports, or digital files of past X-rays, CT scans, ultrasounds, or MRIs. Radiologists rely on these comparisons to monitor healing after surgery, track the progression of injuries, or check for new developments in chronic conditions.
If your earlier imaging was done at another provider, reach out to them ahead of time. Ask for digital copies or reports to be sent directly to your current clinic. Many facilities offer electronic file transfers, which can save you time.
In addition to imaging results, sharing a complete medical history helps refine the assessment process.
Medical History Summary
Providing a detailed medical history is crucial for safe and accurate imaging. Be sure to disclose information about previous surgeries, injuries, chronic conditions (such as diabetes or kidney problems), and any known allergies – especially if you’ve had reactions to contrast dyes. If you have implanted devices like pacemakers, cochlear implants, or aneurysm clips, bring documentation that specifies their make and model.
As Canopy Healthcare explains:
"By providing detailed diagnostic imaging we can improve patient care and better treatment outcomes."
For those undergoing visa medical examinations, it’s mandatory to provide past medical records and a list of current medications or prescriptions for the panel physician to complete the required health certificates. Be sure to bring photocopies of old medical reports, a list of any medicines you’re taking, and current prescriptions. Even seemingly small details, like a recent tattoo or claustrophobia, can influence scan protocols.
Procedure-Specific Items
Every scan comes with its own set of requirements. Being prepared can save you time and ensure everything goes as smoothly as possible. Along with your general documents, these specific tips can help you get ready for your appointment.
Appropriate Clothing
Choose loose-fitting, metal-free clothing without zips, buttons, or underwire. For MRI scans in particular, remove all metal items such as underwire bras, glasses, watches, jewellery, hearing aids, and hair clips. If you have non-removable piercings, let the radiologist know.
Skip makeup and hairspray, as they can contain metal particles. If you’re using a transdermal medicine patch, check with your doctor beforehand, as some patches contain metal that could cause burns during an MRI. Also, if you’ve recently had a tattoo, it’s best to wait at least six weeks before undergoing an MRI to reduce the chance of skin irritation.
Preparation Requirements by Scan Type
- CT scans with contrast and gallbladder/upper abdomen ultrasounds: Fast for 4–6 hours before your appointment.
- Pelvic, renal, or prostate ultrasounds: Drink 3–4 glasses of water one hour before your scan and avoid emptying your bladder.
- Abdominal CT scans: You may need to drink a barium or iodine-based contrast dye at specific intervals before the scan.
If your scan requires sedation, fast for four hours beforehand and arrive an hour early. Make sure someone can drive you home afterward, and plan to take the rest of the day off work. Always check your appointment confirmation letter for detailed instructions, and unless directed otherwise by your doctor, continue taking your usual medications.
sbb-itb-16a0ccc
Special Circumstances
Some appointments require extra preparation beyond the standard checklist. Here’s what you need to know for specific cases.
Visa Medical Examinations
For visa medical imaging appointments, having your original valid passport is a must – photocopies or digital versions won’t cut it. If you don’t have a passport, you can bring an original New Zealand Certificate of Identity or a Refugee Travel Document, as long as it includes a photo.
You’ll also need your eMedical reference number (NZER) or your Immigration New Zealand health case reference number (NZHR). For imaging-only appointments, like a chest X-ray, a referral letter from a Panel Physician who has already set up your case in the immigration database is required. Don’t forget to bring your glasses or contact lenses if a vision test is part of your appointment.
Other essentials include a list of your current medications with dosages, any relevant past medical reports, or previous X-ray results. If you’re using a licensed immigration adviser, bring a completed "Immigration Adviser Details" form (INZ 1160). Women should aim to book their appointment after their period has ended to avoid blood affecting urine test results. Pregnant applicants should bring a certificate or letter from their doctor confirming the pregnancy. For anyone aged 17 or younger, a parent or legal guardian must accompany them to sign consent forms.
Additionally, some scans might involve specific sedation protocols.
Sedation Requirements
If sedation is part of your scan – often for procedures like an MRI if you experience claustrophobia or anxiety – you’ll need a prescription from your GP beforehand. Make sure to take your sedative only after signing the required legal consent forms. You’ll also need to arrange for someone to drive you home, as taxis or rideshare services like Uber aren’t recommended after sedation. Plan to take the rest of the day off to relax and recover.
Mobility or Accessibility Requirements
If you have mobility challenges or require additional assistance, let the clinic know when booking your appointment. You’re welcome to bring a support person, family member, or interpreter with you. Some clinics allow up to two support people.
If you’re bringing a child and need assistance yourself, arrange for an additional adult (usually over 14 years old) to supervise the child, as children typically aren’t allowed in procedure rooms. If needed, you can request a chaperone from the clinic staff during physical examinations.
These guidelines ensure that any unique requirements are addressed, complementing the general preparations outlined earlier.
Items to Leave at Home
To avoid delays and ensure smooth imaging during your scan, it’s best to leave certain items at home.
Jewellery and Metal Items
Metal items can interfere with imaging and even pose safety risks. Before your scan, remove all jewellery, watches, glasses, hair clips, and hearing aids. For MRI scans, underwire bras must also be removed, as their metal components can interact with the scanner’s magnetic field. This interaction can cause metal objects to move, heat up (potentially causing burns), or distort the images. Similarly, for X-rays and CT scans, metal or plastic items covering the area being examined can block the imaging beam and obscure key details.
Interestingly, some makeup and hairspray products contain tiny metal particles that can also disrupt MRI imaging. To avoid complications, skip cosmetics on the day of your MRI.
For added convenience, leave all non-essential jewellery at home and opt for comfortable, metal-free clothing. Elastic-waist pants and a simple top are ideal, as they may save you from having to change into a hospital gown.
Electronic Devices
The strong magnetic fields in MRI machines can damage or dislodge smartphones, tablets, fitness trackers, and similar electronics. These items should be removed and stored safely before entering the scan room. If you rely on wearable medical electronics, such as an insulin pump or glucose monitor, inform the clinic when booking your appointment. These devices may need special handling to ensure safety. Similarly, implanted devices like pacemakers or cochlear implants require a thorough review by professionals before proceeding with an MRI.
Leaving electronic devices at home not only prevents potential damage but also helps keep your appointment running smoothly. Taking these steps ensures a hassle-free experience on the day of your scan.
Conclusion
Getting ready for your imaging appointment doesn’t have to be complicated. Make sure to bring along your referral, a photo ID, and any previous imaging results. These help the clinic confirm everything is safe and avoid unnecessary delays.
It’s also important to follow any specific instructions for your scan to ensure the images are clear and useful. Arriving 10–30 minutes early gives you time to handle paperwork, change clothing if needed, and address any last-minute questions. This bit of preparation helps everything run smoothly and supports accurate results.
If you’re unsure about anything – like metal implants or pregnancy concerns – reach out to your radiology clinic for guidance. They’re there to help.
FAQs
What if I forget my referral or photo ID?
If you forget your referral or photo ID, reach out to your healthcare provider or the imaging centre before your appointment. They can guide you on alternative ways to verify your identity or make necessary arrangements. Since a referral is typically required, double-checking beforehand can help you avoid any delays.
Can the clinic access my old scans, or should I bring them?
The clinic can review your past scans if they were shared before or mentioned in your records. Still, it’s wise to bring along any recent or important scans to make sure your healthcare provider has everything needed for your appointment.
How do I know if I need to fast or drink water before my scan?
If fasting is necessary, you’ll need to avoid eating for up to 4 hours before your scan. For certain scans, such as abdominal or pelvic imaging, you might be asked to drink water to keep your bladder full. Otherwise, most scans don’t require any special preparation. Be sure to follow any specific instructions given by your radiology provider.
Related Blog Posts

Leave a Reply